java.net member

Rechercher dans ce site

Réutiliser des composants composites dans JSF 2 – Le fichier jar - Article en français

>> 22 February 2011

English Article

Composite components ou composants composites en JSF 2 est parmi les outils très puissants. L'utilisation de cette technique permet d'économiser beaucoup de temps et d'efforts (Je reviendrai sur l'utilisation des composants composites dans des prochains articles). Cependant, pour arriver à cette fin, il est conseillé de mettre ce genre de composants dans un fichier .jar, pour permettre une utilisation simple, en simplement copier ce fichier dans le dossier war/WEB-INF/lib. Il est bien sûr possible, par exemple dans la phase de développement de copier le dossier " resources ", pour pouvoir utiliser les composants composites, mais cela, ne donne pas toute la puissance de composants ré-utilisables " write once, run many ", vue la difficulté de copier à chaque fois le(s) dossier(s) de composants et leurs classes.

Ce petit tutoriel commence par  les étapes manuelle du processus de packaging dans un fichier .jar, afin de décrire la composition du fichier .jar de composants, libre à vous par la suite d'écrire par exemple un script Ant pour automatiser l'ensemble des étapes. Un script d'exemple est inclus à la fin.

Ce tutoriel est réalisé avec :
Eclipse Helios, GAEJ (Google App Engine pour Java) plateforme et MyFaces Core 2.0.4


Copier dans le dossier META.INF

Copier le dossier "resources"

Copier le dossier "resources" de war/resources vers src/META-INF. Dans ce dossier, il y a un sous dossier pour les composants (ka dans l'exemple), avec d'autres sous dossiers pour les autres ressources (images, stylesheets, javascript, etc.)

Copier le fichier faces-config.xml dans le dossier META.INF

Créer un fichier .taglib.xml dans le dossier META-INF
Cette étape est optionnelle, permettant d'utiliser un name-space personnalisé pour utiliser les composants. Ce fichier a pour nom : nom_de_library.taglib.xml (par exemple ici le library d’appel " ka " et le fichier aura pour nom ka.taglib.xml)


META.INF/
            resources/
                               ka/            (library de composants)
                              css/           stylesheets
                              images/    images  
                              js/                  Javascript
             
        faces-config.xml

         ka.taglib.xml    


Les classes beans associées aux composants composites, sont à mettre dans la racine du fichier .jar avec leurs packages.

ka.taglib.xml

<facelet-taglib xmlns="http://java.sun.com/xml/ns/javaee"
xmlns:xsi="http://www.w3.org/2001/XMLSchema-instance"
xsi:schemaLocation="http://java.sun.com/xml/ns/javaee
http://java.sun.com/xml/ns/javaee/web-facelettaglibrary_2_0.xsd"
version="2.0">

<namespace>http://www.java_javafx.com/ka</namespace>
<composite-library-name>ka</composite-library-name>
</facelet-taglib>


faces-config.xml

<?xml version="1.0" encoding="UTF-8"?>
<faces-config xmlns="http://java.sun.com/xml/ns/javaee"
 xmlns:xsi="http://www.w3.org/2001/XMLSchema-instance"
 xsi:schemaLocation="http://java.sun.com/xml/ns/javaee http://java.sun.com/xml/ns/javaee/web-facesconfig_2_0.xsd"
 version="2.0">

<application>


<resource-bundle>
<base-name>com.java_javafx.ka.composite.localizedMessages</base-name>
<var>msgsc</var>
</resource-bundle>
<!-- set locales -->
<locale-config>
<default-locale>en</default-locale>
<supported-locale>fr</supported-locale>
<supported-locale>de</supported-locale>
<supported-locale>ar</supported-locale>

</locale-config>
<!-- end locals -->
</application>


 </faces-config>


logo.xhtml
Note:
" home " est le nom donné à la classe bean (ManagedBean). Cet exemple d'un composant composite, affiche simplement une image accompagnée d'une Url. Primefaces (excellente  library ou bibliothèque) est utilisée ici pour afficher une boîte de dialogue, avant de quitter le site.

<?xml version="1.0" encoding="UTF-8" ?>
<!DOCTYPE html PUBLIC "-//W3C//DTD XHTML 1.0 Strict//EN" "http://www.w3.org/TR/xhtml1/DTD/xhtml1-strict.dtd">
<html xmlns="http://www.w3.org/1999/xhtml"
xmlns:composite="http://java.sun.com/jsf/composite"
xmlns:h="http://java.sun.com/jsf/html"
xmlns:f="http://java.sun.com/jsf/core"
xmlns:p="http://primefaces.prime.com.tr/ui"

>
<composite:interface>

<composite:attribute name="image" required="true" />
<composite:attribute name="url" required="true" />
<composite:attribute name="styleClass" default="icon"/>
<composite:attribute name="isDialog" default="false"/>


</composite:interface>

<composite:implementation>

<h:outputStylesheet library="css" name="jsf.css" target="head"/>
<h:outputStylesheet library="css" name="primeFacesThemes/ui-lightness/skin.css" target="head"/>

<h:inputHidden binding="#{home.hiddenComponent}">
<f:attribute name="url" value="#{cc.attrs.url}"/>
</h:inputHidden>

<h:panelGrid rendered="#{cc.attrs.isDialog}" style="border:0">
<h:commandLink onclick="cd.show()">
<h:graphicImage url="#{cc.attrs.image}" styleClass="#{cc.attrs.styleClass}" border="0"/>
</h:commandLink>
<!-- confirm dialog -->
<p:confirmDialog message="#{msgsc.quit_message} ?"
    header="#{msgsc.quit_header}" severity="alert" widgetVar="cd" modal="true">
    <h:panelGrid columns="2" style="border:0" >
  
    <h:commandButton value="#{msgsc.quit_yes}" action="#{home.go}" oncomplete="cd.hide()" ajax="false"/>
  
    <h:commandButton value="#{msgsc.quit_no}" onclick="cd.hide();"/>
  
    </h:panelGrid>
  
</p:confirmDialog>
</h:panelGrid>

<h:panelGrid rendered="#{!cc.attrs.isDialog}" style="border:0">
<h:commandButton action="#{home.go}" image="#{cc.attrs.image}" styleClass="#{cc.attrs.styleClass}"/>

</h:panelGrid>

</composite:implementation>
</html>

Exporter le fichier .jar

Un clic droit sur le projet dans Package Explorer d'Eclipse -> Export


Sélectionner  Java -> Jar file -> Next


Sélectionner les dossiers "com" et "META.INF" dans  war -> WEB-INF -> classes.
Décocher  ".classpath" and ".project".
Entrer un nom et le chemin pour votre fichier .jar.
Vous pouvez ici sélectionner uniquement les classes ou exporter les classes avec les fichier sources.
"Finish"


Retravailler le fichier .jar

Pour pouvoir réutiliser le .jar comme library ou bibliothèque dans un autre projet JSF procéder comme suite :

Décompresser le jar obtenu dans l'étape précédante

Dans le dossier obtenu, déplacer les dossiers META-INF et com vers la racine du .jar tout en gardant le fichier MANIFEST.MF


La racine du .jar


Recomposer le fichier .jar

Dans un terminal taper la commande suivante suivie de Enter:

jar -cvf fileName.jar *


Installer le fichier .jar comme une library (ou bibliothèque)

Il suffit de copier le fichier .jar dans le dossier lib de n'importe quel projet JSF

war -> WEB-INF -> lib (le fichier .jar obtenu)

Ajouter le fichier .jar dans Java Build Path du projet

Ant Build

Ici est un exemple rapide d'un Script Ant. Je suis sûr que vous pouvez ajouter des instructions puissantes pour le rendre vraiment utilisable dans vos projets :)


<?xml version="1.0" encoding="UTF-8"?>
<project name="createJar" basedir="." default="makejar">
  
    <property name="war" value="${basedir}/war" />
    <property name="classes" value="${basedir}/war/WEB-INF/classes" />

      <!--change the destination .jar file -->
    <property name="jarFile" value="/home/kas/hello777.jar" />
  
     <!--choose a destination tmp folder to copy the components -->
     <property name="tmpDir" value="/home/kas/tmp-6_fev_2010_n777" />  
     <property name="webInf" value="${basedir}/war/WEB-INF" />
  
    <target name="makejar">
      
        <mkdir dir="${tmpDir}"/>

    <!-- Ecrire un fichier à la vollé  .taglib.xml (option) -->

        <echo file="${tmpDir}/ka.taglib.xml" ><![CDATA[<facelet-taglib xmlns="http://java.sun.com/xml/ns/javaee"
            xmlns:xsi="http://www.w3.org/2001/XMLSchema-instance"
            xsi:schemaLocation="http://java.sun.com/xml/ns/javaee
            http://java.sun.com/xml/ns/javaee/web-facelettaglibrary_2_0.xsd"
            version="2.0">

            <namespace>http://www.java_javafx.com/ka</namespace>
            <composite-library-name>ka</composite-library-name>
            </facelet-taglib>
          
            ]]></echo>
        <copy todir="${tmpDir}" >
            <fileset dir="${war}">
            <include name="resources/" />
            </fileset>
        </copy>
      <!--Il est possible de copier tous les dossiers nécessaires au composants -->
        <copy todir="${tmpDir}/resources" >
                            <fileset dir="${war}">
                            <include name="css/" />
                            <include name="images/"/>
                            <include name="primeFacesThemes/" />
                            </fileset>
                        </copy>
              
        <jar destfile="${jarFile}"  basedir="${classes}" includes="com/">
                                     
                        <metainf dir="${tmpDir}" >
                            <include name="resources/" />
                            <include name="ka.taglib.xml"/>
                            </metainf>
                        <metainf dir="${webInf}">
                            <include name="faces-config.xml"/>
                        </metainf>
                  </jar>
            
        <delete dir="${tmpDir}" />
    </target>


</project>

Read more...

JSF2 Reuse composite components – Packaging in a Jar file - English Article

L'article en français

JSF2 gives the components oriented development all its energy. One of these powerful features is using composite components.

I'll be back in future articles to developing and using composite components in JSF2

The real power of composite components in JSF is to reuse them with a minimum effort. It's always off course possible, especially in development phase to copy resources folder and reuse these components. But to achieve a write once run many, with a minimum effort for the user, you can package the composite components inside a .jar file. Like this the user has only to add this .jar into war/WEB-INF/lib folder in any project and use it normally with its name-space.

This tutor begins by what you can do manually to package correctly all what you need in a .jar file, this is explained only to let you understand how this can be done under the hood. You can do this , very easily using an ant script for instance. At the end there is a really minimal Ant script to automatically do all the manual steps.

This tutor is written using Eclipse Helios, GAEJ (Google App Engine for Java) platform and MyFaces Core 2.0.4.


Put in META.INF


Copy "resources" folder

Copy "resources" folder, from Webapp (war) folder to src/META-INF. Inside "resources", there are sup-folders for composite components, and other resources libraries, like css, images,javascript, etc. I have called my sub-folder for composite components "ka" in this example.

Copy faces-config.xml into META.INF

Create under META.INF a taglib file

Do this, only if you want to use customized name-space. This file must be called libraryName.taglib.xml (libraryName is the name of the sub-folder of resources containing the composite components).

META.INF/
            resources/
                               ka/            (library with composite components)
                               css/           stylesheets
                               images/    images   
                               js/                  Javascript
              
        faces-config.xml

         ka.taglib.xml   


The bean class(es) associated with the composite components (if any), will be put in .jar's root with it's package.

ka.taglib.xml

<facelet-taglib xmlns="http://java.sun.com/xml/ns/javaee"
xmlns:xsi="http://www.w3.org/2001/XMLSchema-instance"
xsi:schemaLocation="http://java.sun.com/xml/ns/javaee
http://java.sun.com/xml/ns/javaee/web-facelettaglibrary_2_0.xsd"
version="2.0">

<namespace>http://www.java_javafx.com/ka</namespace>
<composite-library-name>ka</composite-library-name>
</facelet-taglib>


faces-config.xml

<?xml version="1.0" encoding="UTF-8"?>
<faces-config xmlns="http://java.sun.com/xml/ns/javaee"
 xmlns:xsi="http://www.w3.org/2001/XMLSchema-instance"
 xsi:schemaLocation="http://java.sun.com/xml/ns/javaee http://java.sun.com/xml/ns/javaee/web-facesconfig_2_0.xsd"
 version="2.0">

<application>


<resource-bundle>
<base-name>com.java_javafx.ka.composite.localizedMessages</base-name>
<var>msgsc</var>
</resource-bundle>
<!-- set locales -->
<locale-config>
<default-locale>en</default-locale>
<supported-locale>fr</supported-locale>
<supported-locale>de</supported-locale>
<supported-locale>ar</supported-locale>

</locale-config>
<!-- end locals -->
</application>


 </faces-config>


logo.xhtml

Note:
"home" is the name of the ManagedBean. This is an example of a composite component. This example displays an image with a url. Primefaces, the excellent library is used here to display a dialog before leaving the site.

<?xml version="1.0" encoding="UTF-8" ?>
<!DOCTYPE html PUBLIC "-//W3C//DTD XHTML 1.0 Strict//EN" "http://www.w3.org/TR/xhtml1/DTD/xhtml1-strict.dtd">
<html xmlns="http://www.w3.org/1999/xhtml"
xmlns:composite="http://java.sun.com/jsf/composite"
xmlns:h="http://java.sun.com/jsf/html"
xmlns:f="http://java.sun.com/jsf/core"
xmlns:p="http://primefaces.prime.com.tr/ui"

>
<composite:interface>

<composite:attribute name="image" required="true" />
<composite:attribute name="url" required="true" />
<composite:attribute name="styleClass" default="icon"/>
<composite:attribute name="isDialog" default="false"/>


</composite:interface>

<composite:implementation>

<h:outputStylesheet library="css" name="jsf.css" target="head"/>
<h:outputStylesheet library="css" name="primeFacesThemes/ui-lightness/skin.css" target="head"/>

<h:inputHidden binding="#{home.hiddenComponent}">
<f:attribute name="url" value="#{cc.attrs.url}"/>
</h:inputHidden>

<h:panelGrid rendered="#{cc.attrs.isDialog}" style="border:0">
<h:commandLink onclick="cd.show()">
<h:graphicImage url="#{cc.attrs.image}" styleClass="#{cc.attrs.styleClass}" border="0"/>
</h:commandLink>
<!-- confirm dialog -->
<p:confirmDialog message="#{msgsc.quit_message} ?"
    header="#{msgsc.quit_header}" severity="alert" widgetVar="cd" modal="true">
    <h:panelGrid columns="2" style="border:0" >
   
    <h:commandButton value="#{msgsc.quit_yes}" action="#{home.go}" oncomplete="cd.hide()" ajax="false"/>
   
    <h:commandButton value="#{msgsc.quit_no}" onclick="cd.hide();"/>
   
    </h:panelGrid>
   
</p:confirmDialog>
</h:panelGrid>

<h:panelGrid rendered="#{!cc.attrs.isDialog}" style="border:0">
<h:commandButton action="#{home.go}" image="#{cc.attrs.image}" styleClass="#{cc.attrs.styleClass}"/>

</h:panelGrid>

</composite:implementation>
</html>

Export .jar file

Right click on the project in the PackageExplorer -> Export


Select Java -> Jar file


Go to war -> WEB-INF -> classes -> select "com" and "META.INF" folders.
Uncheck ".classpath" and ".project". Enter a name and a path for the "JAR file"
Select to export only the class files or to export classes and source files
Click on "Finish"


Recomposing the jar

In the final .jar, the exported folders are all gathered under war/ folder, along side a newely created META-INF folder. This is not what we need. We need our META-INF directory at the root of the .jar. In the root folder we need also ours classes inside their packages. Here is what we shall do for a correct .jar structure.


Unzip the .jar file

In the produced folder

Merge war/WEB-INF/classes/META.INF with the root's META-INF folder, and move
war/WEB-INF/classes/com to the root folder


Here is the root folder


In a terminal type followed by Enter:

jar -cvf fileName.jar *


Installing the .jar as a library

Copy the produced .jar file to any another project in
war -> WEB-INF -> lib

Add the added jar into project's Java Build Path

Ant Build File

Please note that this example is only a quick and dirty one. I'm sure that you can add some powerful instructions and adapt it to suite your need.


<?xml version="1.0" encoding="UTF-8"?>
<project name="createJar" basedir="." default="makejar">
   
    <property name="war" value="${basedir}/war" />
    <property name="classes" value="${basedir}/war/WEB-INF/classes" />

      <!--change the destination .jar file -->
    <property name="jarFile" value="/home/kas/hello777.jar" />
   
     <!--choose a destination tmp folder to copy the components -->
     <property name="tmpDir" value="/home/kas/tmp-6_fev_2010_n777" />   
     <property name="webInf" value="${basedir}/war/WEB-INF" />
   
    <target name="makejar">
       
        <mkdir dir="${tmpDir}"/>

    <!--These instructions are used to write .taglib.xml file on the fly
          This file is optional and needed only if you want to use your own name-space when using composite components -->

        <echo file="${tmpDir}/ka.taglib.xml" ><![CDATA[<facelet-taglib xmlns="http://java.sun.com/xml/ns/javaee"
            xmlns:xsi="http://www.w3.org/2001/XMLSchema-instance"
            xsi:schemaLocation="http://java.sun.com/xml/ns/javaee
            http://java.sun.com/xml/ns/javaee/web-facelettaglibrary_2_0.xsd"
            version="2.0">

            <namespace>http://www.java_javafx.com/ka</namespace>
            <composite-library-name>ka</composite-library-name>
            </facelet-taglib>
           
            ]]></echo>
        <copy todir="${tmpDir}" >
            <fileset dir="${war}">
            <include name="resources/" />
            </fileset>
        </copy>
      <!--you can copy into resources folder any other folders you need -->
        <copy todir="${tmpDir}/resources" >
                            <fileset dir="${war}">
                            <include name="css/" />
                            <include name="images/"/>
                            <include name="primeFacesThemes/" />
                            </fileset>
                        </copy>
               
        <jar destfile="${jarFile}"  basedir="${classes}" includes="com/">
                                    
                        <metainf dir="${tmpDir}" >
                            <include name="resources/" />
                            <include name="ka.taglib.xml"/>
                            </metainf>
                        <metainf dir="${webInf}">
                            <include name="faces-config.xml"/>
                        </metainf>
                  </jar>
           
        <delete dir="${tmpDir}" />
    </target>


</project>

Read more...

Télécharger gratuitement le livre Windows 7 super astuces

>> 18 February 2011


Développer efficacement passe obligatoirement par une connaissance approfondie du système d'exploitation. Aujourd'hui je propose aux utilisateurs Windows, de télécharger gratuitement et sans aucune formalité le livre "Windows 7 super Astuces" de Azzam ALNIJRES

Read more...

The Complete Guide to Managing Datastore on Google App Engine for Java using Bulk Loader

>> 14 February 2011


You can download a pdf copy here: http://apps.java-javafx.com/download.jsp

The bulk loader tool can upload and download data to and from your application's datastore, or development server.

The bulk loader tool communicates with your application running on App Engine, or development server, using remote_api, a request handler included with the App Engine runtime environment. This way the Bulk Loader can access the datastore using the remote application.

Data Format

CSV, XML, and text files(Format is customized using a configuration file). The default is a special format (No need for configuration file)

SDK Version

1.3.8 or sup

Configuration File

A configuration file can be generated automatically using the "bulk loader" tool. This file must be edited to suit your needs

Installing a Bulk Loader

Please note that you must have python 2.5 or sup, installed and configured.
The bulk loader is available via the "appcfg.py" command. To have "appcfg.py", you must download and install the Python SDK of Google App Engine.

  • Download Python SDK
  • Unzip. This will give "google_appengine" folder
  • You can call "appcfg.py" directly from the "google_appengine" folder or add this folder to your path
  • A quick test is to tape in a terminal : ./appcfg.py (Linux).
       You'll get some messages about using this program
  • Add RemoteApi to your URI mapping. In war/WEB-INF/web.xml, add these lines
     web.xml

     <servlet>
     <servlet-name>RemoteApi</servlet-name>
     <servlet-  class>com.google.apphosting.utils.remoteapi.RemoteApiServlet
    </servlet-class>
   </servlet>
      
   <servlet-mapping>
   <servlet-name>RemoteApi</servlet-name>
   <url-pattern>/remote_api</url-pattern>
   </servlet-mapping>


  • Add a security constraint (only admin has access to remote_api). Add the following lines to web.xml
      <security-constraint>

      <web-resource-name>remote-api</web-resource-name>
      <web-resource-collection>
             <url-pattern>/remote_api</url-pattern>
     </web-resource-collection>
     <auth-constraint>
              <role-name>admin</role-name>
    </auth-constraint>
           
    </security-constraint>


  • Upload your application to Google App Engine Server
  • I advise you to create a folder for your data and configuration file (something like Data) inside "google_appengine" folder, to keep them from the other content.

Note:
The handler servlet class is :    com.google.apphosting.utils.remoteapi.RemoteApiServlet.

Download and Upload Entities without configuration

Download
Commands:

All Entities of all kinds

appcfg.py download_data --application=<app-id> --url=http://<appname>.appspot.com/[remote_api_path] --filename=<data-filename>

Only one kind
appcfg.py download_data --application=<app-id> --kind=<kind> --url=http://<appname>.appspot.com/[remote_api_path] --filename=<data-filename>

Download only one kind from development server
appcfg.py download_data --application=<app-id> --kind=<kind> --url=http://localhost:8888/[remote_api_path] –filename=<data-filename>

Note:
The resulting data file are in special format, suitable for backup and restoring
Downloading all entities of all kinds only works on App Engine, and does not work with the development server (download one kind works fine). Uploading all entities of all kinds can be done in development server

When data are downloaded, the entities are stored along with their original keys. When the data is uploaded, the original keys are used. If an entity exists in the datastore with the same key as an entity being uploaded, the entity in the datastore is replaced.
You can use upload_data to replace the data in the app from which it was dumped, or you can use it to upload the data to a different application. Please note here that keys may not be the same as the original application.


Example

Download entities of one kind without configuration.
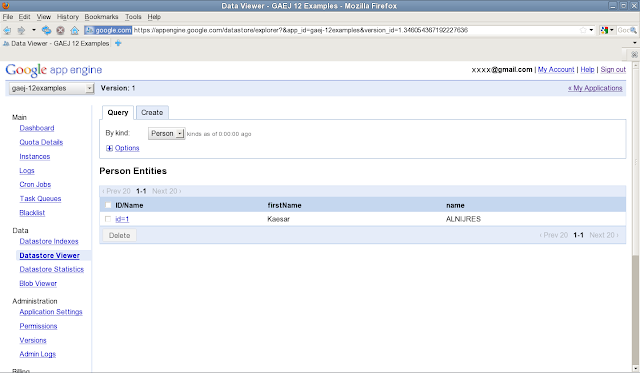
In Datastore I have one kind "Person", with only one entity (or record)
package com.java_javafx.ka;

import com.google.appengine.api.datastore.Key;
import javax.jdo.annotations.*;


/**
 * @author Kaesar ALNIJRES
 *
 */
@PersistenceCapable(identityType = IdentityType.APPLICATION)
public class Person {
   
    @PrimaryKey
    @Persistent(valueStrategy = IdGeneratorStrategy.IDENTITY)
    private Key key;

    @Persistent
    private String name="";
   
    @Persistent
    private String firstName="";

    /**
     * @return the key
     */
    public Key getKey() {
        return key;
    }

    /**
     * @param key the key to set
     */
    public void setKey(Key key) {
        this.key = key;
    }

    /**
     * @return the name
     */
    public String getName() {
        return name;
    }

    /**
     * @param name the name to set
     */
    public void setName(String name) {
        this.name = name;
    }

    /**
     * @return the firstName
     */
    public String getFirstName() {
        return firstName;
    }

    /**
     * @param firstName the firstName to set
     */
    public void setFirstName(String firstName) {
        this.firstName = firstName;
    }


}


Development datastore with Person

In a terminal (Linux)
Go to the "google_appengine" folder and type :

./appcfg.py download_data --application=gaej-12examples --kind=Person --url=http://gaej-12examples.appspot.com/remote_api --filename=Data/Person

Note:
  • gaej-12examples, is my own application ID
  • This is a direct call to "appcfg.py", don't forget to use the current directory (.) for Linux
  • In --filename=Data/Person. I have created a folder inside "google_appengine", to keep data. Give the file name any name you want.

Dowloading data from application server

Example

Download one kind from development server

In a terminal (linux) type :

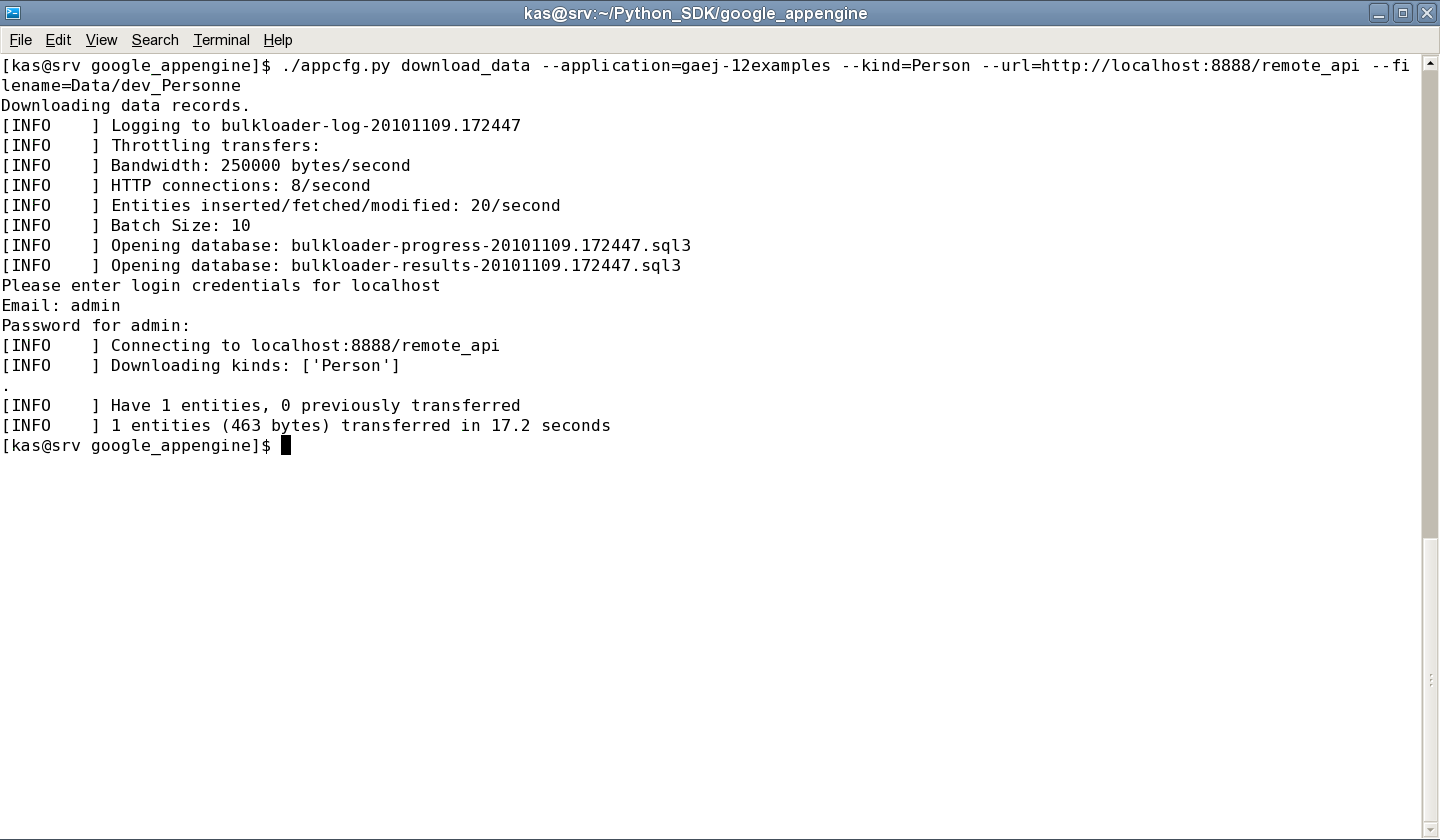
./appcfg.py download_data --application=gaej-12examples --kind=Person --url=http://localhost:8888/remote_api --filename=Data/dev_Personne


Downloading one kind from development server

Trying to download all kinds from development server returns an error

Upload Data

Command

To upload data to the app's datastore from a file created by appcfg.py download_data, run the following command:

All entities of all kinds

appcfg.py upload_data --application=<app-id> --filename=<data-filename> --url=http://<appname>.appspot.com/[remote_api_path]

Only one kind

appcfg.py upload_data --application=<app-id> --kind=<kind> --filename=<data-filename> --url=http://<appname>.appspot.com/[remote_api_path]

Loading Data Into the Development Server (all kinds)

appcfg.py upload_data --application=<app-id> --filename=<data-filename> --url=http://localhost:8080/[remote_api_path]

Loading Data Into the Development Server (one kind)

appcfg.py upload_data --application=<app-id> --kind=<kind> --filename=<data-filename> --url=http://localhost:8080/[remote_api_path]

Example :
Will upload one kind downloaded in the previous example

In a terminal (Linux) type :

./appcfg.py upload_data --application=gaej-12examples --kind=Person --filename=Data/Person --url=http://gaej-12examples.appspot.com/remote_api

Note:
Remember the downloaded data is "Person" in "Data" folder


Uploading to application server, kind Person

Example

Uploading to development server

In a terminal (linux) type


./appcfg.py upload_data --application=gaej-12examples --kind=Person --filename=Data/Person --url=http://localhost:8888/remote_api

Note:
For localhost use admin for "Email" and nothing as password


Datastore Viewer before uploading the data (development server)

Uploading data to development server
Now data are in datastore

Bulk Loader Configuration File

You can configure the bulk loader with a configuration file that specifies the format of uploaded and downloaded data. You can specify for instance that the downloaded data be in CSV format.
The bulk loader can generate a configuration file based on your app's datastore. This configuration file must then be edited to suite your needs. The most important parts of this file is the "transformers" (how the data should be transformed upon input and output). The generated file is based on the datastore statistics, this one must be up-to-date to get a correct result.

Generate an automatic configuration file

Command

appcfg.py create_bulkloader_config --filename=<file name>.yaml --url=http://<appname>.appspot.com/remote_api

Note:
Generate a configuration file only works on App Engine, and not on the development server.


Example
Always from the same Datastore, used for the test, create a configuration file

In a terminal (linux) type :

./appcfg.py create_bulkloader_config --filename=Data/ka_config.yaml --url=http://gaej-12examples.appspot.com/remote_api

Create a configuration file

Edit the configuration file 

As mentioned above the interesting part here is the "transformers",one set for each kind. You need to specify the format of input or output for each "kind", namely the "connector" item (instead of "TODO:"). The fields "connector" must be filled  before you can use this file.A connector can be csv, xml (import and export), or simpletext (for export only)
It's also possible to give some options to each connector, like for example, giving a different external name for a property.
For an automatic key generation on import you can remove the entire __key__ property from the property map. The key will be omitted on export.


ka_config.yaml (before edition)

# Autogenerated bulkloader.yaml file.
# You must edit this file before using it. TODO: Remove this line when done.
# At a minimum address the items marked with TODO:
#  * Fill in connector and connector_options
#  * Review the property_map.
#    - Ensure the 'external_name' matches the name of your CSV column,
#      XML tag, etc.
#    - Check that __key__ property is what you want. Its value will become
#      the key name on import, and on export the value will be the Key
#      object.  If you would like automatic key generation on import and
#      omitting the key on export, you can remove the entire __key__
#      property from the property map.

# If you have module(s) with your model classes, add them here. Also
# change the kind properties to model_class.
python_preamble:
- import: base64
- import: re
- import: google.appengine.ext.bulkload.transform
- import: google.appengine.ext.bulkload.bulkloader_wizard
- import: google.appengine.ext.db
- import: google.appengine.api.datastore
- import: google.appengine.api.users

transformers:

- kind: Person
  connector: # TODO: Choose a connector here: csv, simplexml, etc...
  connector_options:
    # TODO: Add connector options here--these are specific to each connector.
  property_map:
    - property: __key__
      external_name: key
      export_transform: transform.key_id_or_name_as_string

    - property: firstName
      external_name: firstName
      # Type: String Stats: 1 properties of this type in this kind.

    - property: name
      external_name: name
      # Type: String Stats: 1 properties of this type in this kind.


ka_config.yaml (after edition)

Only a "connector" is specified. All default options stay the same


# Autogenerated bulkloader.yaml file.
# You must edit this file before using it. TODO: Remove this line when done.
# At a minimum address the items marked with TODO:
#  * Fill in connector and connector_options
#  * Review the property_map.
#    - Ensure the 'external_name' matches the name of your CSV column,
#      XML tag, etc.
#    - Check that __key__ property is what you want. Its value will become
#      the key name on import, and on export the value will be the Key
#      object.  If you would like automatic key generation on import and
#      omitting the key on export, you can remove the entire __key__
#      property from the property map.

# If you have module(s) with your model classes, add them here. Also
# change the kind properties to model_class.
python_preamble:
- import: base64
- import: re
- import: google.appengine.ext.bulkload.transform
- import: google.appengine.ext.bulkload.bulkloader_wizard
- import: google.appengine.ext.db
- import: google.appengine.api.datastore
- import: google.appengine.api.users

transformers:

- kind: Person
  connector: csv
  connector_options:
    # TODO: Add connector options here--these are specific to each connector.
  property_map:
    - property: __key__
      external_name: key
      export_transform: transform.key_id_or_name_as_string

    - property: firstName
      external_name: firstName
      # Type: String Stats: 1 properties of this type in this kind.

    - property: name
      external_name: name
      # Type: String Stats: 1 properties of this type in this kind.


Download and Upload Entities Using Configuration File


It's now obvious, that using a configuration file for downloading and uploading data, gives us the opportunity to choose the format of data to import or export. It's also possible to customize some options for properties (connector and connector options)

Download Data

Command :

Download a kind

appcfg.py download_data --application=<app-id> --filename=<data-filename>.csv --url=http://<appname>.appspot.com/[remote_api_path] --config_file=<config-filename>.yaml

Note:
  • kind argument is required for this operation
  • Although it's not possible to create a configuration file using the development server, it's possible to download data from it using a configuration file created from the application server

Example:

Download data from app's server, using config file
In a terminal (linux) type:


./appcfg.py download_data --config_file=Data/ka_config.yaml --filename=Data/data.csv --kind=Person --url=http://gaej-12examples.appspot.com/remote_api


Download data (csv)


data.csv
firstName,key,name
Kaesar,1,ALNIJRES

Uploading
To upload data to the app's datastore from a file downloaded using download_data, and a configuration file.

Command

Upload a kind to the Application Server

appcfg.py upload_data --application=<app-id> --filename=<data-filename>.csv --url=http://<appname>.appspot.com/[remote_api_path] --config_file=<config-filename>.yaml –kind=<kind-name>

Upload a kind to the development server

appcfg.py upload_data --application=<app-id> --filename=<data-filename>.csv –url=http://localhost:8888/[remote_api_path] --config_file=<config-filename>.yaml –kind=<kind-name>

Note:
  • kind argument is required
  • Application ID is required to upload to the development server

Example

Uploading to the development server using a configuration file and data file

In a terminal (linux) type :

./appcfg.py upload_data --filename=Data/data2.csv --url=http://localhost:8888/remote_api --config_file=Data/ka_config.yaml --application=gaej-12examples --kind=Person

Upload and add Entities

It's possible, using a configuration file and a data file to add entities

Example:

We upload data to application server using the downloaded file (edited), and the configuration file

Edit Data/data.csv
Add one entity to our kind Person

firstName,key,name
Kaesar,1,ALNIJRES
no,2,nobody


In a terminal (linux) type :

./appcfg.py upload_data --config_file=Data/ka_config.yaml --filename=Data/data.csv --url=http://gaej-12examples.appspot.com/remote_api --kind=Person

Datastore with the new entity


Create a new Kind and Entities

Using the bulk loader, a configuration file and a data file, it's possible to create a new kind on the datastore and populate it with entities.
In this case we upload new data using an edited config_file

Example :

We want to add a new Kind "Location", this contains a "street" and "city" and upload it to development server ( works with application server also)

1-First we add "Location" with its properties to our config_file in "transformers: " section

ka_confing.yaml

# Autogenerated bulkloader.yaml file.
# You must edit this file before using it. TODO: Remove this line when done.
# At a minimum address the items marked with TODO:
#  * Fill in connector and connector_options
#  * Review the property_map.
#    - Ensure the 'external_name' matches the name of your CSV column,
#      XML tag, etc.
#    - Check that __key__ property is what you want. Its value will become
#      the key name on import, and on export the value will be the Key
#      object.  If you would like automatic key generation on import and
#      omitting the key on export, you can remove the entire __key__
#      property from the property map.

# If you have module(s) with your model classes, add them here. Also
# change the kind properties to model_class.
python_preamble:
- import: base64
- import: re
- import: google.appengine.ext.bulkload.transform
- import: google.appengine.ext.bulkload.bulkloader_wizard
- import: google.appengine.ext.db
- import: google.appengine.api.datastore
- import: google.appengine.api.users

transformers:

- kind: Person
  connector: csv
  connector_options:
    # TODO: Add connector options here--these are specific to each connector.
  property_map:
    - property: __key__
      external_name: key
      export_transform: transform.key_id_or_name_as_string

    - property: firstName
      external_name: firstName
      # Type: String Stats: 2 properties of this type in this kind.

    - property: name
      external_name: name
      # Type: String Stats: 2 properties of this type in this kind.
      #---------------------------------------------
- kind: Location

  connector: csv

  connector_options:

    # TODO: Add connector options here--these are specific to each connector.

  property_map:

  
    - property: street

      external_name: street

    
    - property: city

      external_name: city

    
 2-Provide a CSV with "street" and "city"In a file (something like location.csv)


location.csv

street,city
myStreet,myCity


In a terminal (linux) type:

./appcfg.py upload_data --filename=Data/location.csv --url=http://localhost:8888/remote_api --config_file=Data/ka_config.yaml --application=gaej-12examples –kind=Location

Upload data file to create the "Location"

Location is now in Datastore

Read more...

  © Blogger template Simple n' Sweet by Ourblogtemplates.com 2009

Back to TOP